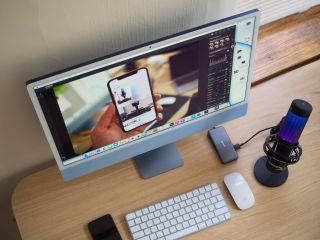
It is common to see people film a video using their phones and digital cameras, while laptops are reserved for editing. Typically, this is the acceptable procedure to create a professional video, but what if you just need a quick short video as a Mac user? Then, you must know how to film a video on MacBook.
Filming a video on a MacBook is easy since virtually every MacBook has an in-built webcam. However, unlike a mobile phone, you need to be familiar with the software you can use to access the webcam to record a video on your MacBook. On the other hand, if your MacBook does not have a webcam or HD webcam (1080p), you can also consider getting external webcams which work perfectly with the methods we will discuss.
How To Record A Video On MacBook Air
Using Photo Booth
The Photo Booth is the best software to take a picture or film a video on MacBook and comes preinstalled on most MacBooks. The Photo Booth gives an almost professional outlook for your video by maintaining a vertical orientation, unlike other software, which tends to flip your video sideways. You can also apply basic effects when photographing or recording with the Photo Booth.
The easy steps below describe how to use the Photo Booth:
- Step 1: Launch the app (Photo Booth). This can be done quickly by navigating to your search bar (CMD + Spacebar) or Finder and typing “Photo Booth”.
- Step 2: Once the app has been fully launched, the object (face) facing the webcam should appear on your screen. At this point, you should set up your background and adjust the lighting to make your video look more professional.
- Step 3: Click the “Record a video button”
at the bottom left to start filming your video. If the “Record a video button” is not in your Photo Booth, click the “Record a movie clip ” button to start recording.
- Step 4: Tap the “Stop Button”
after filming your video.
- Step 5: Preview and Save the video. Photo Booth also lets you preview your video in the filmstrip before you save it. Afterwards, you can export and save your video in your desired location.
Also, you can further edit the video to improve it, although we do not recommend filming a video for professional use on MacBook, especially for webcams that are not HD (720p).
Using QuickTime Player

QuickTime is another software that can be used to film a video on MacBook, although with lesser quality when compared to Photo Booth. On the good side, QuickTime Player allows you to set the volume and other necessary options. You can also view the size of the file while recording.
Here are the steps to film a video on MacBook using QuickTime Player:
- Step 1: Launch the app (QuickTime Player). This can be done by navigating to your search bar (CMD + Spacebar) or Finder and typing “QuickTime Player”.
- Step 2: After launching the app, navigate to the “Menu Bar”; click on “File” and then select “New Movie Recording” from the dropdown. Like the Photo Booth, the screen should display your surroundings, and you can adjust your background to your taste before recording. The only downside here is that the orientation of the video is horizontal.
- Step 3: Click on Options from the menu to change the default settings. The options you can alter include:
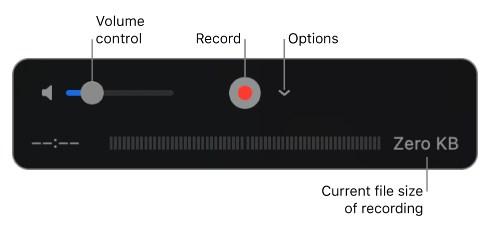
- Volume: You can easily adjust the video’s audio using this option.
- Camera: Select a camera from the available ones if you have more than one for the recording.
- Microphone: Select the one you want for the recording to access available microphones.
- Quality: Let you set the video quality to either high or maximum. The high-quality option lets you create compressible videos with small sizes, while the maximum-quality option lets you film incompressible videos of large files.
- Step 4: Tap the “Record button”
to start recording. Once you are satisfied with the setting, you can start recording by clicking the record button. If you need to pause the video mid-way, click the record button. You can click it again to resume your recording.
- Step 5: Hit the “Stop button”
to stop recording. Tap the Stop button to halt the recording before saving, or tap the Touch Bar if your MacBook comes with it.
- Step 6: Save your video. To save your video, click “File” and hit “Save” from the dropdown. Press the CMD button and S together (CMD + S).
Using third-party software/App
You can also install some third-party apps from the Apple Mac Store for free to film a video on MacBook. These apps include iMovie, OBS Studio, Camtasia, and so on. Third-party apps let you perform extended settings and have enhanced features to make your video quality superb, although these features may be premium. You should find them easy to use since they usually include guides on how to use them.
How To Record A Video On MacBook Pro
The process involved in recording a video on MacBook Pro is similar to that of the MacBook Air explained above. You can simply install the recommended software for free from the Apple Mac Store if you do not have them on your MacBook Pro. However, if your MacBook does not have an in-built webcam, you should consider getting an external one.
How To Film A Video On MacBook Pro Using An External Device
You can also film a video on MacBook using external devices such as iPhones, iPads, and webcams. It is easier to do this using the QuickTime Player. The following are the steps you need to complete this operation:
- Step 1: Launch the QuickTime Player App
- Step 2: Click File and select New Recording
- Step 3: From the popup options, select the external device as camera and set microphone and video quality
- Step 4: Set audio quality to the desired volume
- Step 5: Click the Record button to start recording and the Stop button to halt the video once you are done
- Step 6: Click File again and Save your video to your desired folder
SEE ALSO: How to Delete Apps on Mac – Simple Steps
Conclusion
And that is it! Those are the simple methods to film a video on MacBook within minutes. Moreover, you can invest in some quality external webcams or connect an external device to record videos of better quality for professional use.
Videos filmed with your webcam might not provide the professional outlook you need, but they work well for short videos, especially with the latest HD webcams in MacBook Air and MacBook Pro.
Pingback: Best Video Organizer For Mac -
Pingback: How to Loop Videos on Mac -