
A good video organizer program takes the list-making and makes it fun and straightforward. Mac video organizer and a video thumbnail generator allow you to manage your video files. It also provides categorization based on criteria of hassle-free experience.
Organizing your collection involves arranging your file into a coherent directory structure and naming those directories. It provides an overview of all your videos dispersed on your computer and external storage like external HDDs or network shares.
Mac video organizer software has a detailed user interface with powerful grouping, sorting, and filtering options to browse through your movies. Furthermore, the software is expandable with the plugins in the installation file, which helps you create your movie database formats.
It further allows you to categorize your movies based on these criteria allowing you a hassle-free experience. Some great software to help you organize and sift through your films, making the storing experience hassle-free and user-friendly.
Mac video organizer software lets you categorize your video collections, including series, movies, and even cartoons. Such software helps locate the movie quickly on your hard drive and enables you to research it.
Most of the software has accessibility tools that allow you to post your video online in a matter of seconds and also Provide information about movies ranging from screenplay writers, actors, directors, language, biographies, IMDB ratings, and much more.
Mac video organizer helps you in your research papers about a director, actor, or screenplay writer or simply fulfills your need to know information about your favorite movies.
Ways To Organize Video Files On Mac
The desktop gives you many different ways to arrange the files you are working on. If you keep files, documents, and folders on your desktop, you can organize them to make finding the items you need easier.
Best way to organize video files on Mac and to make minor adjustments to your workflow to help yourself out;
-
Use iCloud Drive
Not only will iCloud Drive help you organize your videos into different folders, but it will also sync them across multiple devices. If you use a work Mac, or even just a desktop and an iPad, iCloud Drive is how your files will automatically be on every device.
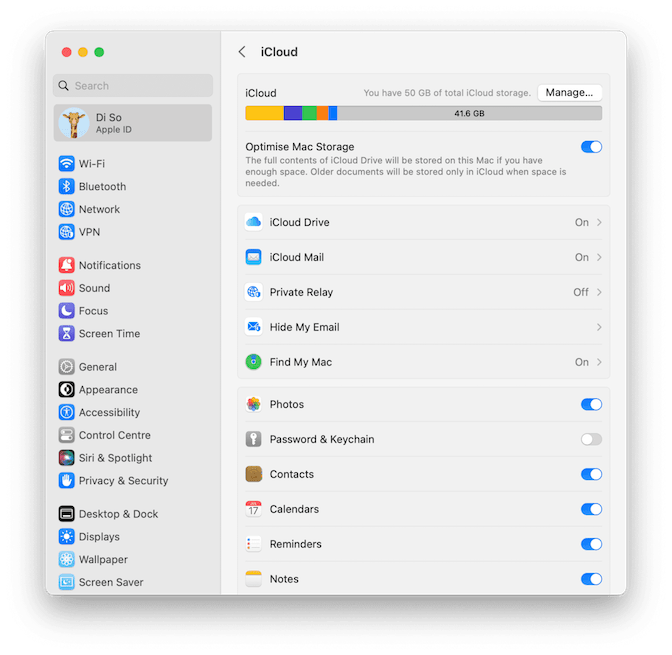
Here is how you can turn on iCloud Drive on your Mac:
- Open system settings.
- Click Apple ID > iCloud.
- Make sure to turn on iCloud Drive.
- Then, click iCloud Drive once again and choose options to select which folder and apps sync with your Mac.
If you are serious about keeping your Mac Video Organizer with iCloud, select the box next to Desktop & Documents Folders.
-
Find and Remove Duplicate Files
The first thing you should do when you start organizing the files is clean the duplicate ones. The last thing you want to waste time on is organizing duplicate files on your Mac.
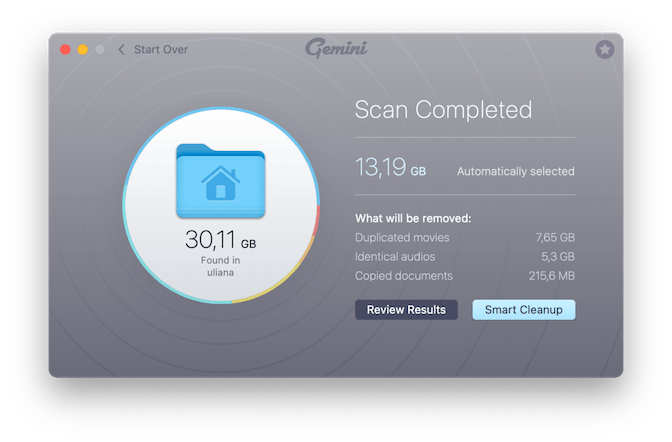
Thankfully, you can use a duplicate finder like Gemini 2 to scan your hard drive and quickly help you eliminate all your duplicates. Once you download Gemini 2 on your Mac, you just follow these steps to start cleaning up your files:
- Download and open Gemini 2.
- Click + > Home Folder.
- Click Smart Cleanup to let it automatically delete your duplicate files. Or click Review Results to sift through the copies yourself and decide which versions you want to keep.
-
Merge Similar Folders
Merging folders (copying a folder to a location with a folder with the same name) sounds like a simple task. If you are not acutely aware of what you are doing, it’s straightforward to end up overwriting files and losing content. Here are the best ways to merge folders on your Mac Video Organizers safely:
- Merge folders using Finder
When dropping a folder into a location with the same folder name, you will receive a message asking if you want to replace the folder in the location or stop the process. Assuming you have different files with the same name, you want to choose “stop” to prevent files from being copied.
To reveal the hidden merge option, follow these easy steps;
- Drag the folder again – only this time, hold down the Option key before releasing.
- You should now have a new ” Merge ” option – click it.
Any files with the same name will automatically have a “2” added to the filename, so the original and the new files remain, and nothing will be lost.
- Merge folders using the Terminal.
An alternative method is to use Terminal and a command called “ditto.” This will merge the contents of two folders in your Mac video Organizer software, including any subfolders within.
- Open Terminal
- Type: ditto -/source_folder-/target_folder
Note – use the folders’ actual names instead of “source_folder” and “target_folder.” You can drag and drop the folders into your Terminal window instead of typing the folder path.
-
Use Smart Folders
Smart folders are great for finding specific files fast. They’re reference folders, so you’re not moving your files anywhere. Smart folders just collect the files based on the search criteria you’ve set up. If you’ve never used a smart folder, follow these steps:
- Open a Finder window.
- Navigate to the folder you want the Smart folder to search. Otherwise, skip to step 3.
- Click File > New Smart Folder.
- Select either This Mac or the folder you navigated to.
- Click +.
- Use the drop-down menus to get your search criteria.
- Then, click save to create the Smart folder to find these files again later.
-
Clean Up Your Downloads Clutter
Your Download folder is the catch-all for everything you save from the internet. If you don’t check this folder regularly, I’m sure you’d be surprised everything is still there. It’s essential to go through there periodically and purge the files you don’t want anymore.
SEE ALSO: How To Film A Video On MacBook: 3 Easy DIY Methods
Wrapping Up
While there might not be one right way to organize the files on your Mac video organizer software, hopefully, after reading this article, you will see many great ways to do it. There’s a lot to remember, and even more features built into MacOS designed for this purpose.
Mac Video Organizer Software is developed to manage the collection of movies and also imports information about them through reputed online databases, which include audio, video codec, resolution, framerate, size, and much more.
The user interface supports translations in 32 languages, and binary and XML file formats can store for cataloging.
Many Mac video Organizer software is often system-oriented or system specialized, which gets the best results out of the software like visual appeal, the user interface, and therefore the quality of the software.
Mac Video Organizer allows you to create your interactive movie catalog and helps you find information about the movie, cast, screenplay writer, director, and movie editions.
You can customize the content of each page on your Mac video organizer, like the reviews, pictures, biographies, ratings and comments, etc.
Pingback: Videos Not Playing on Macbook: How to Fix? -